How to Install and Configure a Printer on your StreamServe Host Windows Server

Scenario: I am continuously being asked to set up printers so that they can communicate with StreamServe. The best way to do this is to configure a printer on the Test host server, make sure its successfully printing and then replicate in the Live host server. This tutorial shall instruct you how to add a printer to a Windows Server.

PLEASE NOTE: The printer I am adding is a ZEBRA label printer for the Goods Intake Bay of a warehouse

  1. Click Start and select Devices and Printers and select the Add a printer option (Figure 1)
37
Figure 1
  1. Select Add a local or network printer as an administrator (Figure 2)
38
Figure 2
  1. Select Add a local printer (Figure 3)

    39
    Figure 3
  2. Select the Create a new port option and make sure it is a Standard TCP/IP port (see Figure 4)
  3. Click Next

    40
    Figure 4
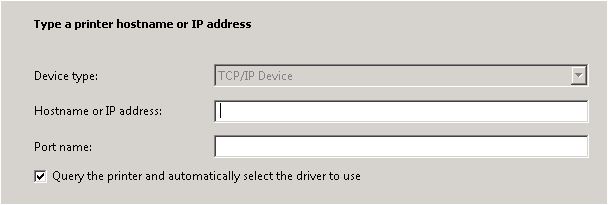
  4. Type the new IP address into the Hostname or IP address textbox (Figure 5). This will automatically input the same IP into the Port name textbox

TIP: If the IP address is already being used then the suffix _1 will be appended to the IP address in the Port name textbox e.g.  xx.xx.xx.xxx_1

  1. Click Next
41
Figure 5
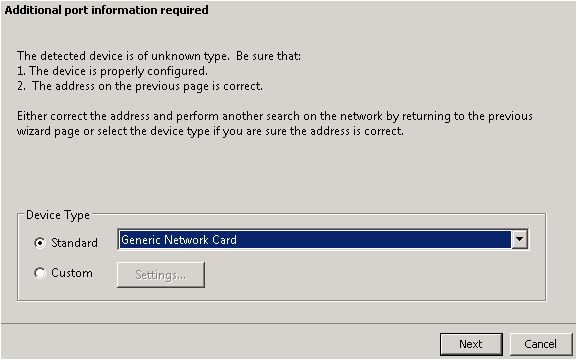
  1. The IP of the printer is queried and detected as long as it is online on the network
  2. Select the Generic Network Card as the Device Type (Figure 6)
  3. Click Next
42
Figure 6
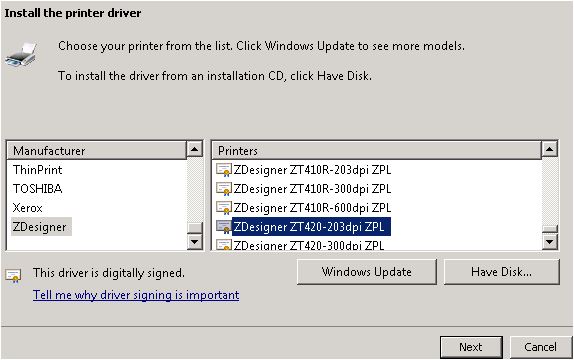
  1. Select the Manufacturer and Printer model you are configuring (Figure 7)

TIP: Click the Windows Update button to update the list of models / drivers from a central Microsoft repository.

  1. Click Next
43
Figure 7
  1. Type the Printer name – you should make this a meaningful name. In this case the name is INTAKE_BAY (Figure 8).
  2. Click Next to install the printer
code10
Figure 8
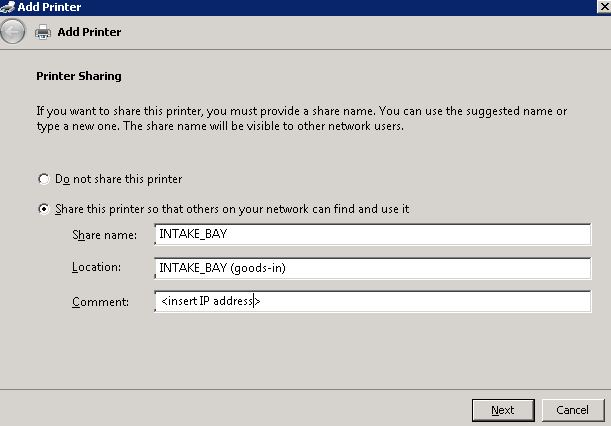
  1. Select the Share this printer … option , type in a meaningful Location and type the IP address into the Comment textbox (Figure 9)
  2. Click Next
code11
Figure 9

IMPORTANT: The printer is now installed. I advise you to run a test page (Figure 10) to make sure it is printing OK.

code12
Figure 10

IMPORTANT: The printer is now visible in Devices and Printers (Figure 11)

code13
Figure 11

How to Simultaneously Output the Same Document via Email and via Printer

Scenario: The business have made a request for the delivery note to not only be emailed to the M3 user but also to be printed to a particular office printer.

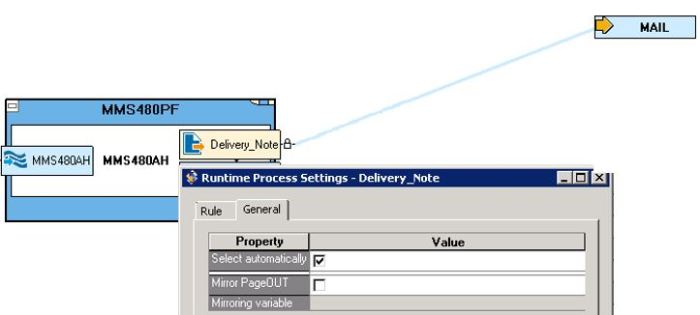
Currently the delivery note (MMS480PF) is emailed to a particular M3 user via the following runtime configuration (Figure 1):

code6
Figure 1: Runtime configuration for an EMAIL-only Delivery Note
  1. Open the Message
  2. Change the name fof the Delivery_Note process to EMAIL_Delivery_Note
  3. Copy the EMAIL_Delivery_Note process
  4. Paste the copied process and rename it Printer_Delivery_Note
  5. Right click on the Printer_Delivery_Note process and select Script…
  6. Insert the following code:

setdestpath("PrinterName"); //for more info on this click here

  1. Open the Runtime
  2. Right-click on each process node and select Settings…
  3. Uncheck the Select automatically checkbox
  4. Connect the new Printer_Delivery_Note process node to your Printer output connector (mine is named PCL6
    • The EMAIL_Delivery_Note process node should be alreadyu connected to the MAIL output connector
  5. Right-click on the each process node and select Connector Selection…
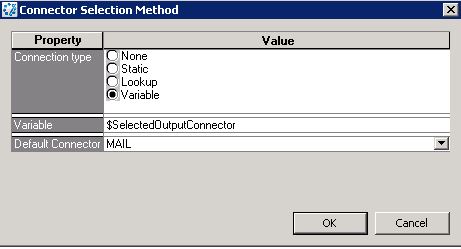
  6. Select the Variable Connection Type and enter a variable name (see Figure 2)
code7
Figure 2
  1. Make sure that the Default Connector is the PCL6 output connector for the new Printer_Delivery_Note process node and MAIL for the EMAIL_Delivery_Note process node (see Figure 3)
code8
Figure 3: Runtime configuration for an Emailed AND printed document
  1. Open the Message
  2. Right-click on the message node and select Script…
  3. Insert the following code:

$SelectedOutputConnector = “MAIL”;
CallProc(“EMAIL_Delivery_Note”);
$SelectedOutputConnector = “PCL6”;
CallProc(“Printer_Delivery_Note”);

Export and deploy and test!

Troubleshoot: Control Center Producing the Fatal error: OutputMode set to Document or Job mode and current Message does not belong to a Job definition. (Connector):MAIL

Explanation: You are deploying an export but the referenced output connector in your message script does not match the selected output connector in your runtime.

  1. Open the message and right-click on the message icon and select Script…
  2. Examine the script and identify the output connector being referenced in the runtime. Figure 1 displays the MAIL output connect being called in our example.
code3
Figure 1: The message script
  1. Open the runtime examine the connection between the process (e.g. Invoice) and the output connector.
  2. You need to ensure that the process is referencing the correct output connector. Right-click on the process and select Connector Selection… Figure 2 shows that the process Invoice is referencing the correct MAIL output connector.
code2
Figure 2: The connector selection method

Export, deploy and test!

Troubleshoot: Control Center Producing the EOF: Fatal error: No output connector:purchase_order

Explanation: You are deploying an export but have forgotten to connect the process purchase_order to an output connector in the Runtime Configuration

1
Figure 1: Runtime Configuration
  1. Open the Runtime
  2. Click on the x icon on the purchase_order process and drag the connection line up to the MAIL Output Connector
  3. Click on the yellow arrow on the MAIL Output Connector and click on the Edit Mail button
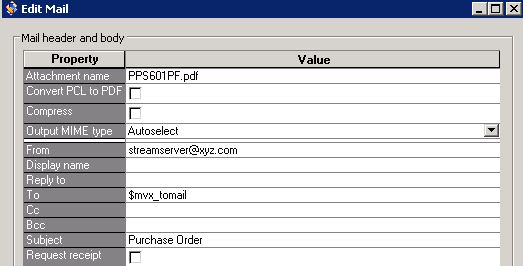
  4. Complete the MAIL configuration similar to Figure 2

Export, deploy and test!

2
Figure 2: MAIL Configuration

Troubleshoot: Control Center producing the error: Connect time-out

Explanation: You are trying to connect to your site ‘Test’ but you received a connecting message for a while and then the Control Center produces the Connect time-out error (see Figure 1). This is happening because the Management Gateway Service has been stopped. You must restart this service.

1
Figure 1: The Connecting to message turns into the a Connect time-out error

Solution: Restart the Stopped Service

  1. Open the Services application on your host server and check the status of the StreamServe Management Gateway service – it has been stopped (see Figure 2)
2
Figure 2: the stopped service
  1. To restart the service, right click on it and select Start and the service will be restarted (see Figure 3)
3
Figure 3: The restarted service
  1. Re-connect to the site and it should connect OK

Troubleshoot: M3 Users are not receiving output (Part 2)

Explanation: Users are complaining that their submitted jobs in M3 are not being received in their inboxes.

Problem Diagnosis

  1. Open MNS206 (M3 Output. Manage per Job)
  2. Change the Sorting order to 6-Output Status
  3. Type SND into the Sts column and type the date into the Ent dt column
  4. Press Enter

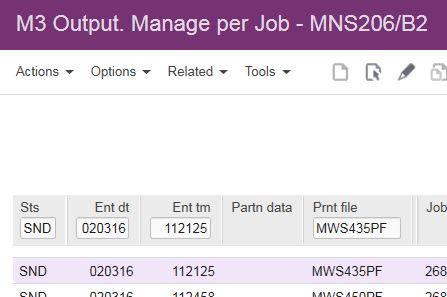
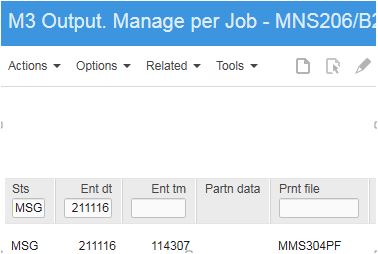
You now have a list of jobs that have the status SND (Sent) which means they have been sent but not saved or received by M3 – they have a status of SAV when they are successfully received by M3. Figure 1 indicates a sample job with SND.

1
Figure 1: A submitted job with status SND

Problem: The problem is with M3. You need to contact your M3 administrators and ask them to view its performance. They should especially check if any autojobs need to be restarted.

Once M3 has been fixed, all jobs with status SND will now automatically begin to hit StreamServe and produce output for users.

You do not need to resend jobs! 

You should monitor all traffic for a while and constantly refresh MNS206 to see jobs change status from SND to SAV (Sent & Saved).

Troubleshoot: M3 Users are not receiving output (Part 1)

Scenario: Users are complaining that their submitted jobs in M3 are not being received in their inboxes.

Problem Diagnosis:

  1. Open MNS206 (M3 Output. Manage per Job)
  2. Change the Sorting order to 6-Output Status
  3. Type MSG into the Sts column and type the date into the Ent dt column
  4. Press Enter

You now have a list of jobs that have the status MSG (Error Detected) – these jobs were sent during the downtime. Figure 1 indicates a sample job with MSG. Now You must find out what error has been detected.

50
Figure 1: A submitted job at status MSG
  1. Right-click on one of the MSG jobs and select Display
    1. The E panel is triggered
  2. The Message is CR_0025 and the description tells you that the server is not responding –  Figure 2 displays these details
49
Figure 2: Job error message onn MNS206/E panel

Problem: The problem is with StreamServe. The Control Center service is no longer running so it needs to be restarted.

Solution: 

  1. Click back to return to MNS206
  2. Open Control Center – the service will not be running
  3. Start the service

All jobs with status MSG will now automatically begin to hit StreamServe and produce output for users.

You do not need to resend jobs! 

You should monitor all traffic for a while and constantly refresh MNS206 to see jobs change status from MSG to SAV (Sent & Saved).

How to Easily Improve Traceability via M3 and your Delivery Note

Scenario: The Quality Department have informed you that they want the trailer number pirnted on every delivery note from now on however, the despatcher will only find out the trailer number at the time of loading.

For the solution I will use the Ext tracking no: textbox in the MWS410/F panel.

Solution Part 1: StreamServe

  1. Open the PageOut and add a label to the header section of your delivery note
  2. Enter the following text into the label: Trailer Number
  3. Drag the field AHOQETRN from the Field folder in the Message window and place it opposite (or beneath) the label Trailer Number
    1. If you have multiple pages you need to complete this step for each page
  4. Export and deploy the project

Solution Part 2: M3

  1. Open MWS410 (Delivery. Open Toolbox)
  2. Right-click on the delivery that you are currently despatching and select Change
  3. The panel MWS410/E opens however, you need to click Next (or hit Enter) to open panel F
  4. In the highlighted textbox in Figure 1, enter the trailer number which is being used for the despatch and click Next.
  5. Click the Back button until you return to MWS410 and proceed with the despatch as normal.

48
Figure 1: Snapshot of MWS410/F
When the Delivery Note is generated it will display the trailer number used for the despatch.


How to control the display of a label based on the value of a spool-field

SCENARIO: Some of your customers require their VAT number to be displayed on the invoice document. Your M3 customer master file only has the VAT number for several customers however you do not want to have the label VAT Number appearing with no accompanying value on an invoice.

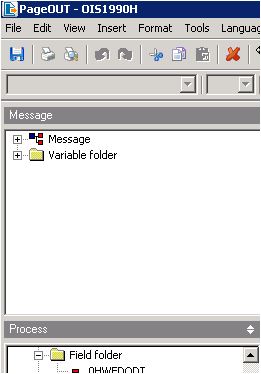
  1. Open the OIS1990H event and transform the spool-field 0HWYVRNO into a variable 
  2. Open the PageOut and insert a Static Text object (this will be your label) to your canvas
  3. Rename the label to VAT Number
  4. In the Message window, collapse the Variable folder and drag the variable $0HWYVRNO to your canvasto the right/below of the label.
34
Figure 1: The Variable folder on the PageOut canvas
  1. Right-click on the label and select Edit Script…
  2. Insert the following code:

    if ($0HWYVRNO = “”) {
    skip();
    }
    else {
    {}
    }

The label VAT Number will now only appear if a value exists for the spool-field 0HWYVRNO. If the spool-field 0HWYVRNO value is blank then the label will be skipped (i.e. not appear).

Export and deploy and test!

Troubleshoot: Control Center producing the error: ‘Fatal error: portx spool=connector (port/printserver)’

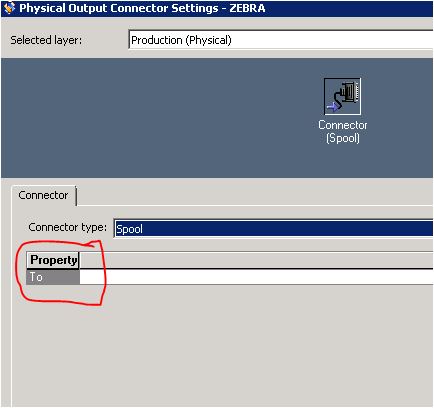
Explanation: You are probably trying to create a new output connector in the Platform and you are using the connector type Spool and you are encountering this error. This is because you have not entered % into the To property – see Figure 1

33
Figure 1: Missing To property value


  1. Open the Platform
  2. Right-click on the new Output Connector and select Settings…
  3. From the Selected layer dropdown select Production (Physical)
  4. Make sure your Connector Type is Spool
  5. Enter % as the To property value
  6. Click OK

Export, deploy and test!